
🎧 Audio Version
Introduction: Why Now Is the Perfect Time to Build a Home Robot?
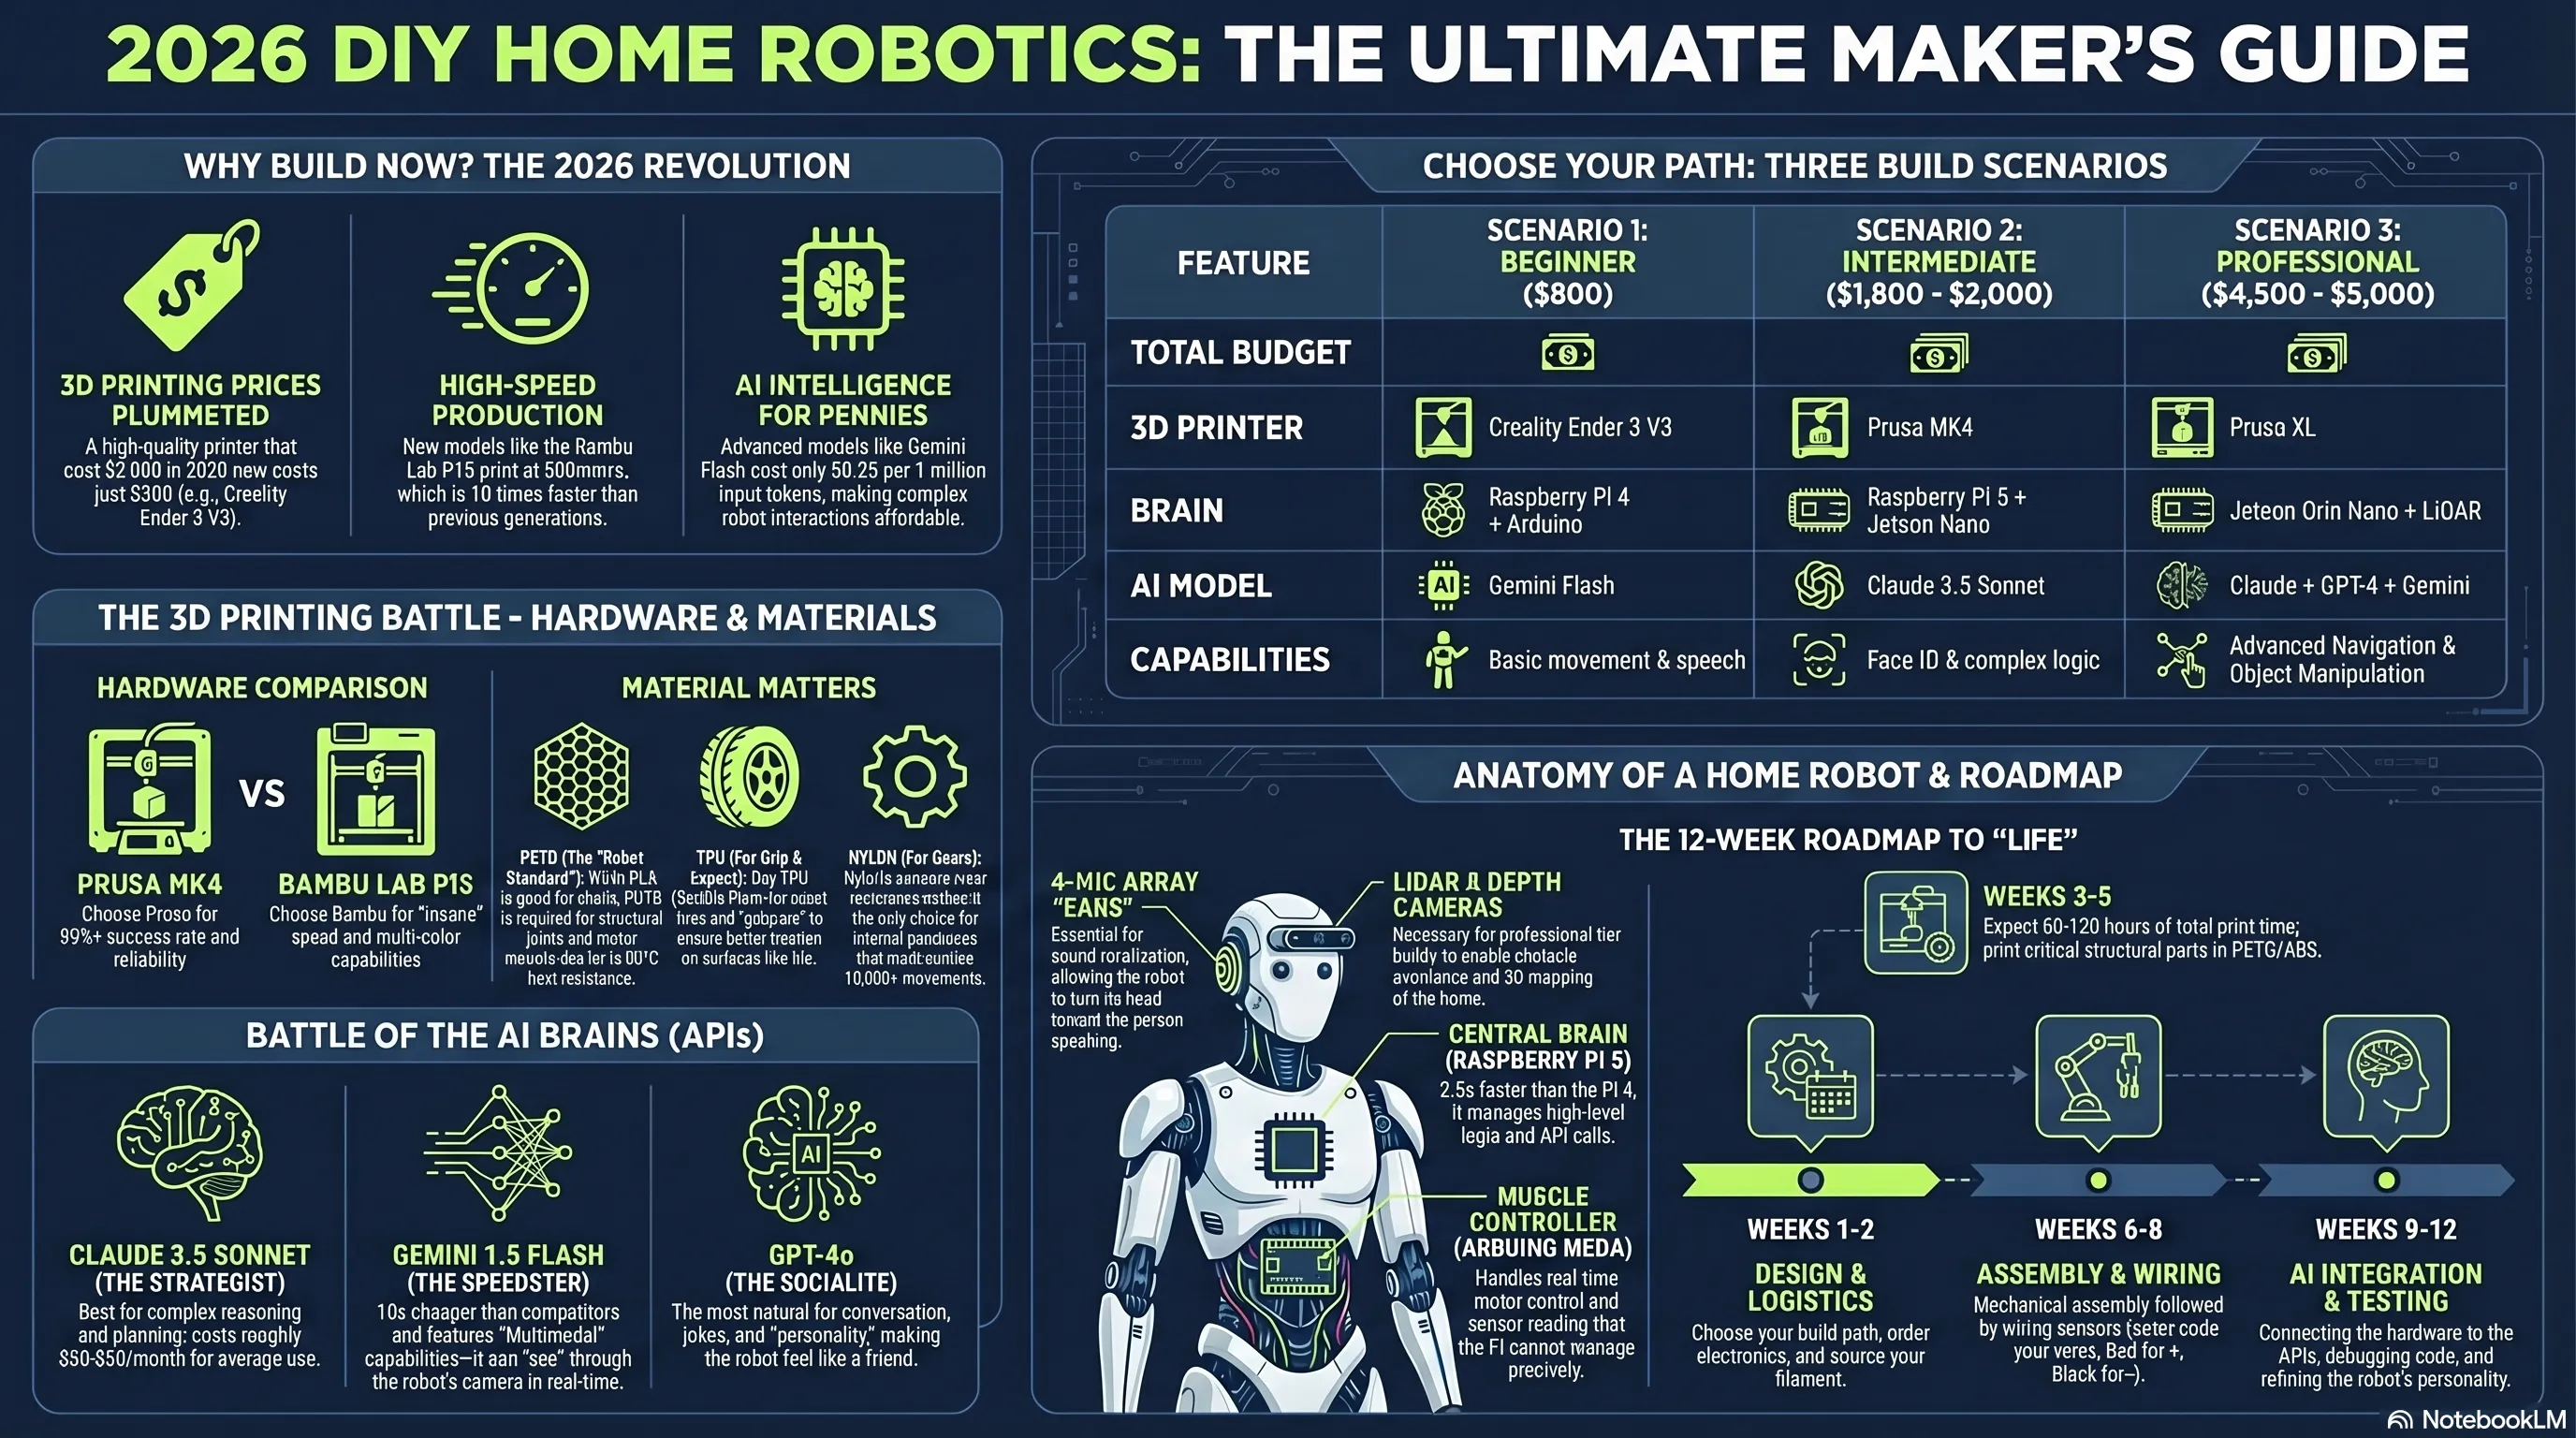
🎯 Why Is 2026 the Golden Year?
1. The 3D Printer Price Revolution: In 2020, a reliable printer cost at least $2,000. Now? The Creality Ender 3 V3 delivers the same quality for $300. The Bambu Lab P1S at $699 prints at 500mm/s—10 times faster than the previous generation. 2. Democratization of Artificial Intelligence: Remember when GPT-3 was only for big companies? Now Claude, Gemini, and GPT-4 are all available with public APIs at incredible prices: - Gemini Flash: $0.35 per 1 million input tokens - Claude Sonnet: $3 per 1 million input tokens - GPT-4o: $5 per 1 million input tokens This means your robot can talk to you 10,000 times for just a few dollars! 3. Pocket-Sized Computing Power: The Raspberry Pi 5 at $80 has the processing power of a 2015 laptop. The Jetson Orin Nano at $500 can run AI models in real-time. These are things that cost $5,000 five years ago.⚠️ Honest Warning Before You Start
This project isn't for everyone. If you: - Don't have patience (building takes 2-6 months) - Fear failure (parts print wrong, code doesn't work) - Have a limited budget (minimum $800 + time) You should stop now. But if you: - Love learning - Want to build something that shocks your friends - Are ready to spend nights debugging code Then continue—because this will be one of the most exciting projects you've ever done! 🚀🎯 Three Paths, Three Budgets, Three Results
In this guide, I've designed three complete scenarios for you: Path 1: Beginner on a Budget ($800) - Printer: Creality Ender 3 V3 ($300) - Brain: Raspberry Pi 4 + Arduino ($115) - AI: Gemini Flash ($10-15/month) - Parts and sensors: $385 - Result: A simple robot that can talk, move, and perform basic tasks Path 2: Mid-Range with High Quality ($2,000) - Printer: Prusa MK4 ($1,099) - Brain: Raspberry Pi 5 + Jetson Nano ($230) - AI: Claude 3.5 Sonnet ($30-50/month) - Advanced parts: $671 - Result: Smart robot with face recognition, natural language processing, and complex decision-making Path 3: Professional for Serious Builders ($5,000) - Printer: Prusa XL ($2,499) - Brain: Jetson Orin Nano + LiDAR ($900) - AI: Combination of Claude + GPT-4 + Gemini ($100-150/month) - Industrial parts: $1,601 - Result: Nearly commercial robot with advanced navigation, object manipulation, and real intelligence I personally started with Path 2 and that's my recommendation—excellent balance between price and quality. But if you have a limited budget, Path 1 gives amazing results too. And if you want to build something truly professional? Path 3 is waiting for you.📖 My First Robot Story: The Big Failure
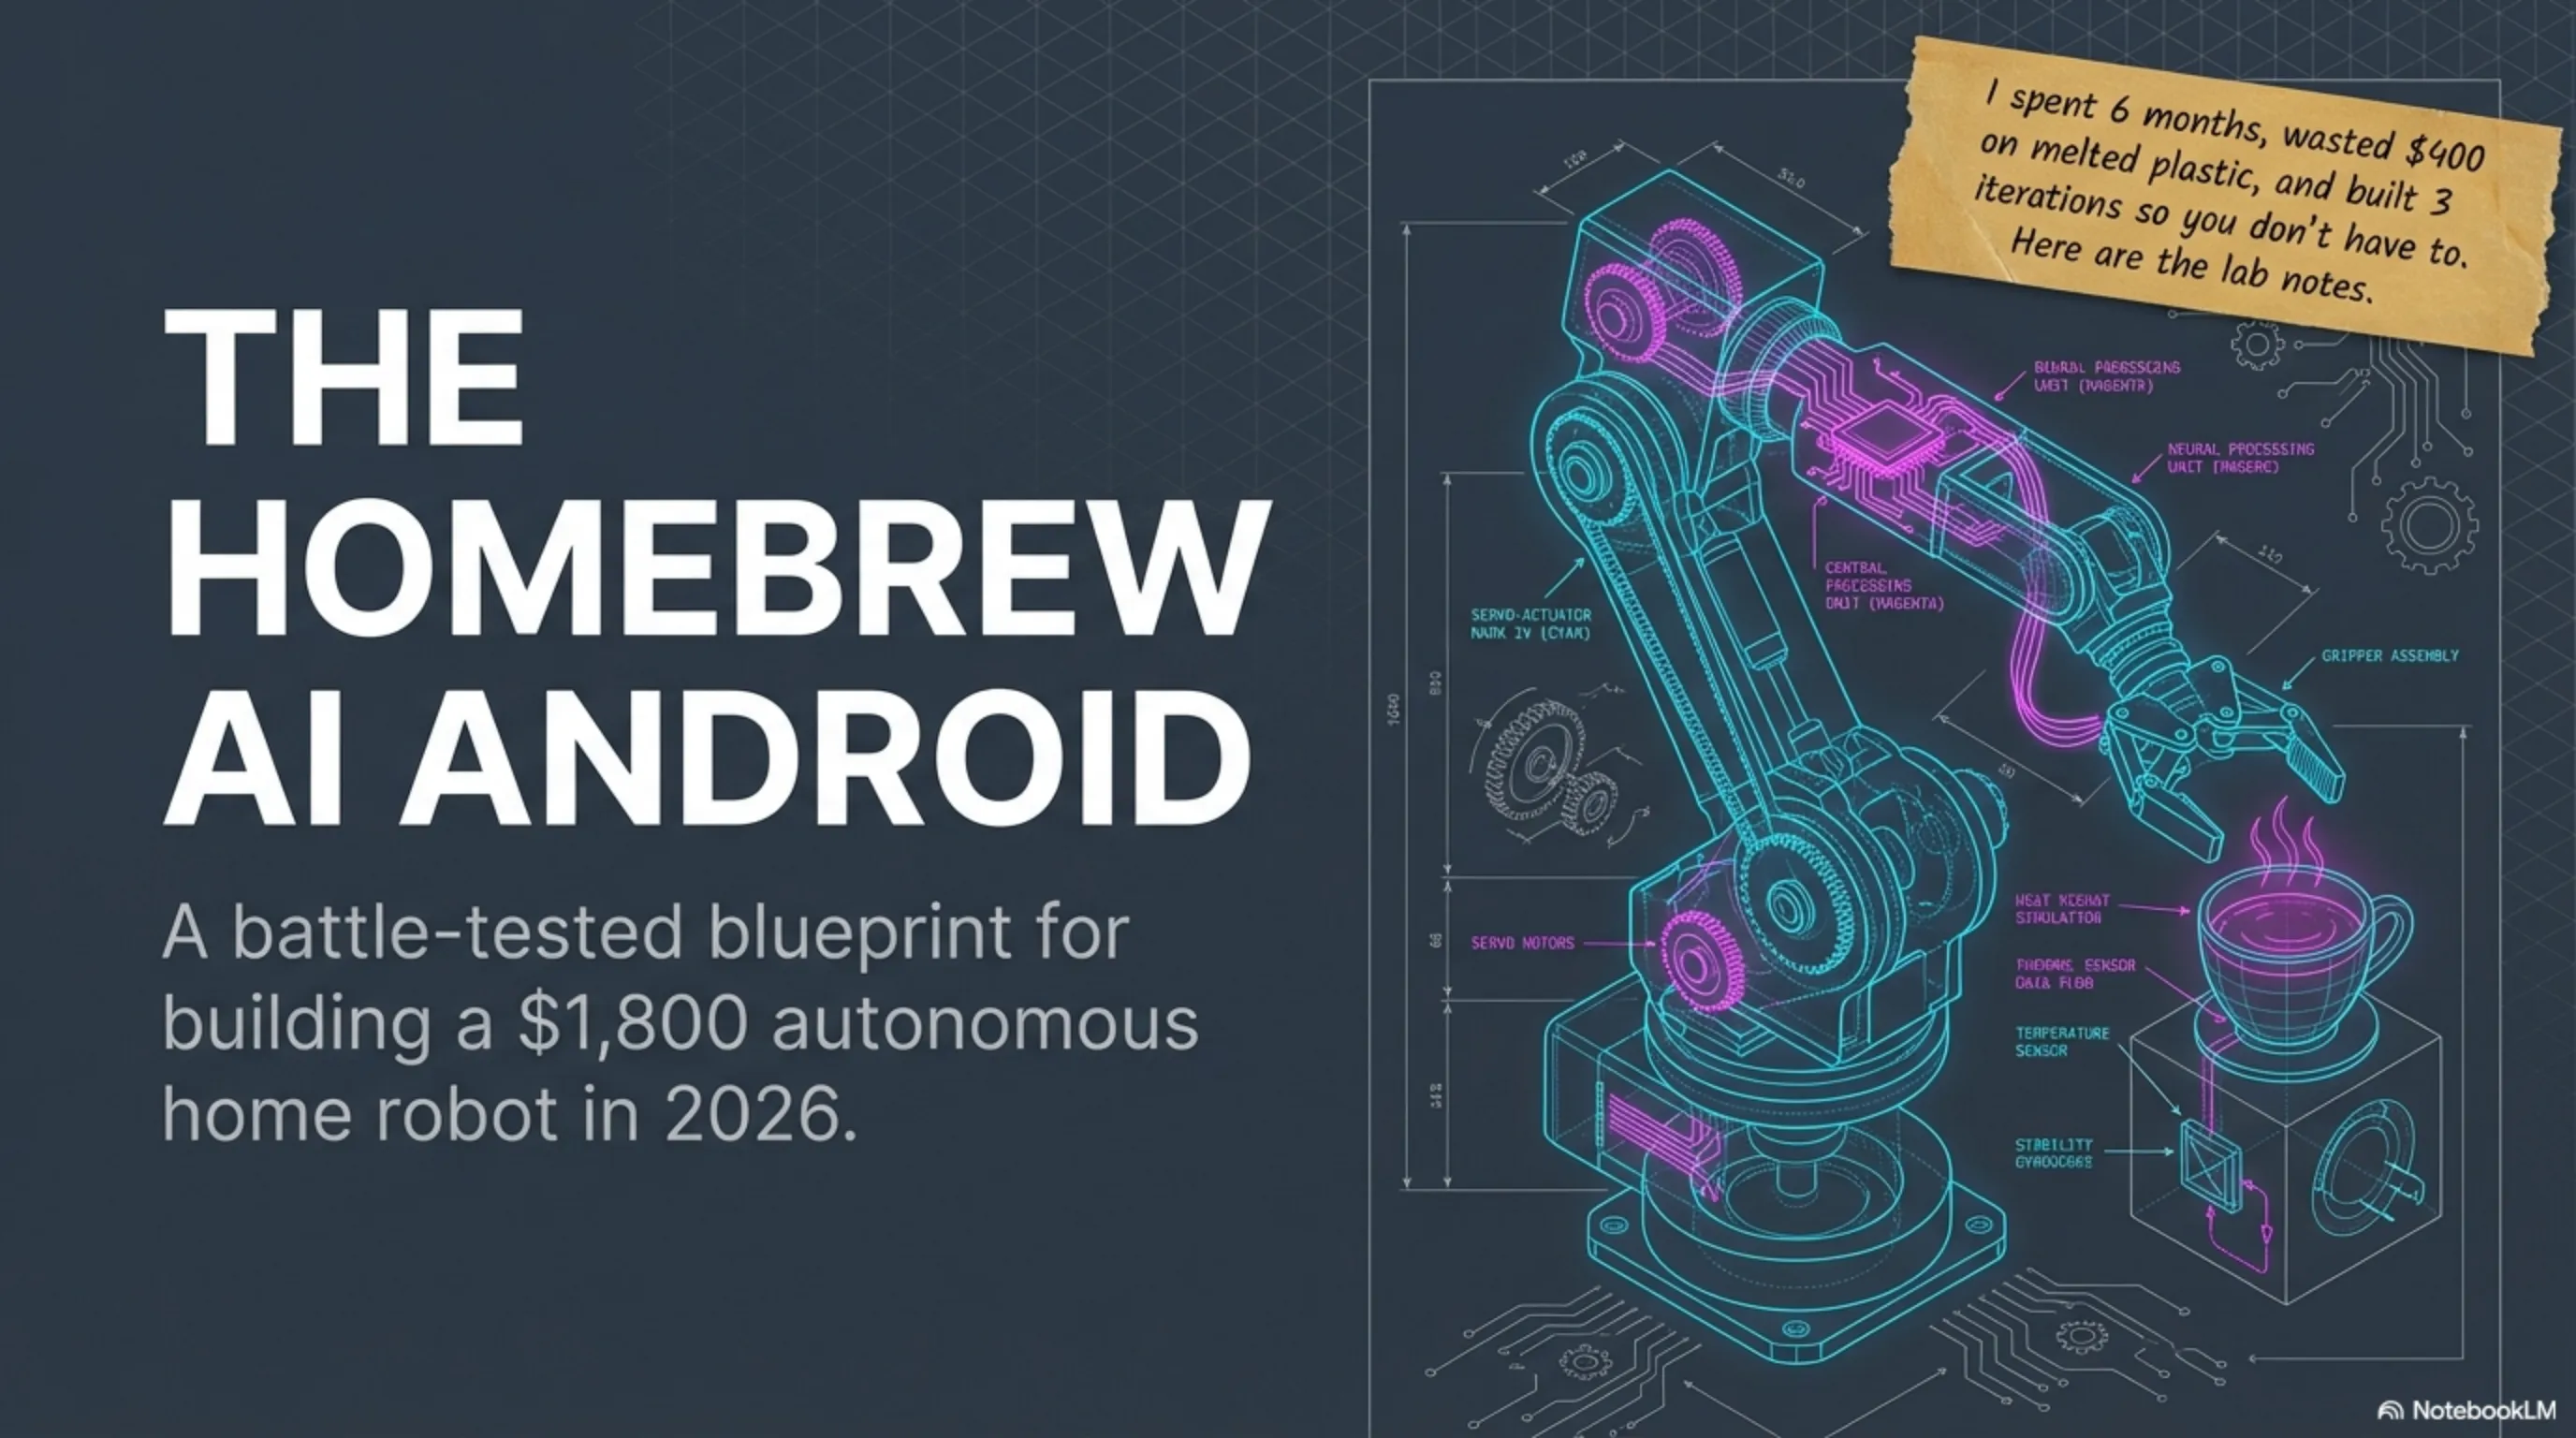
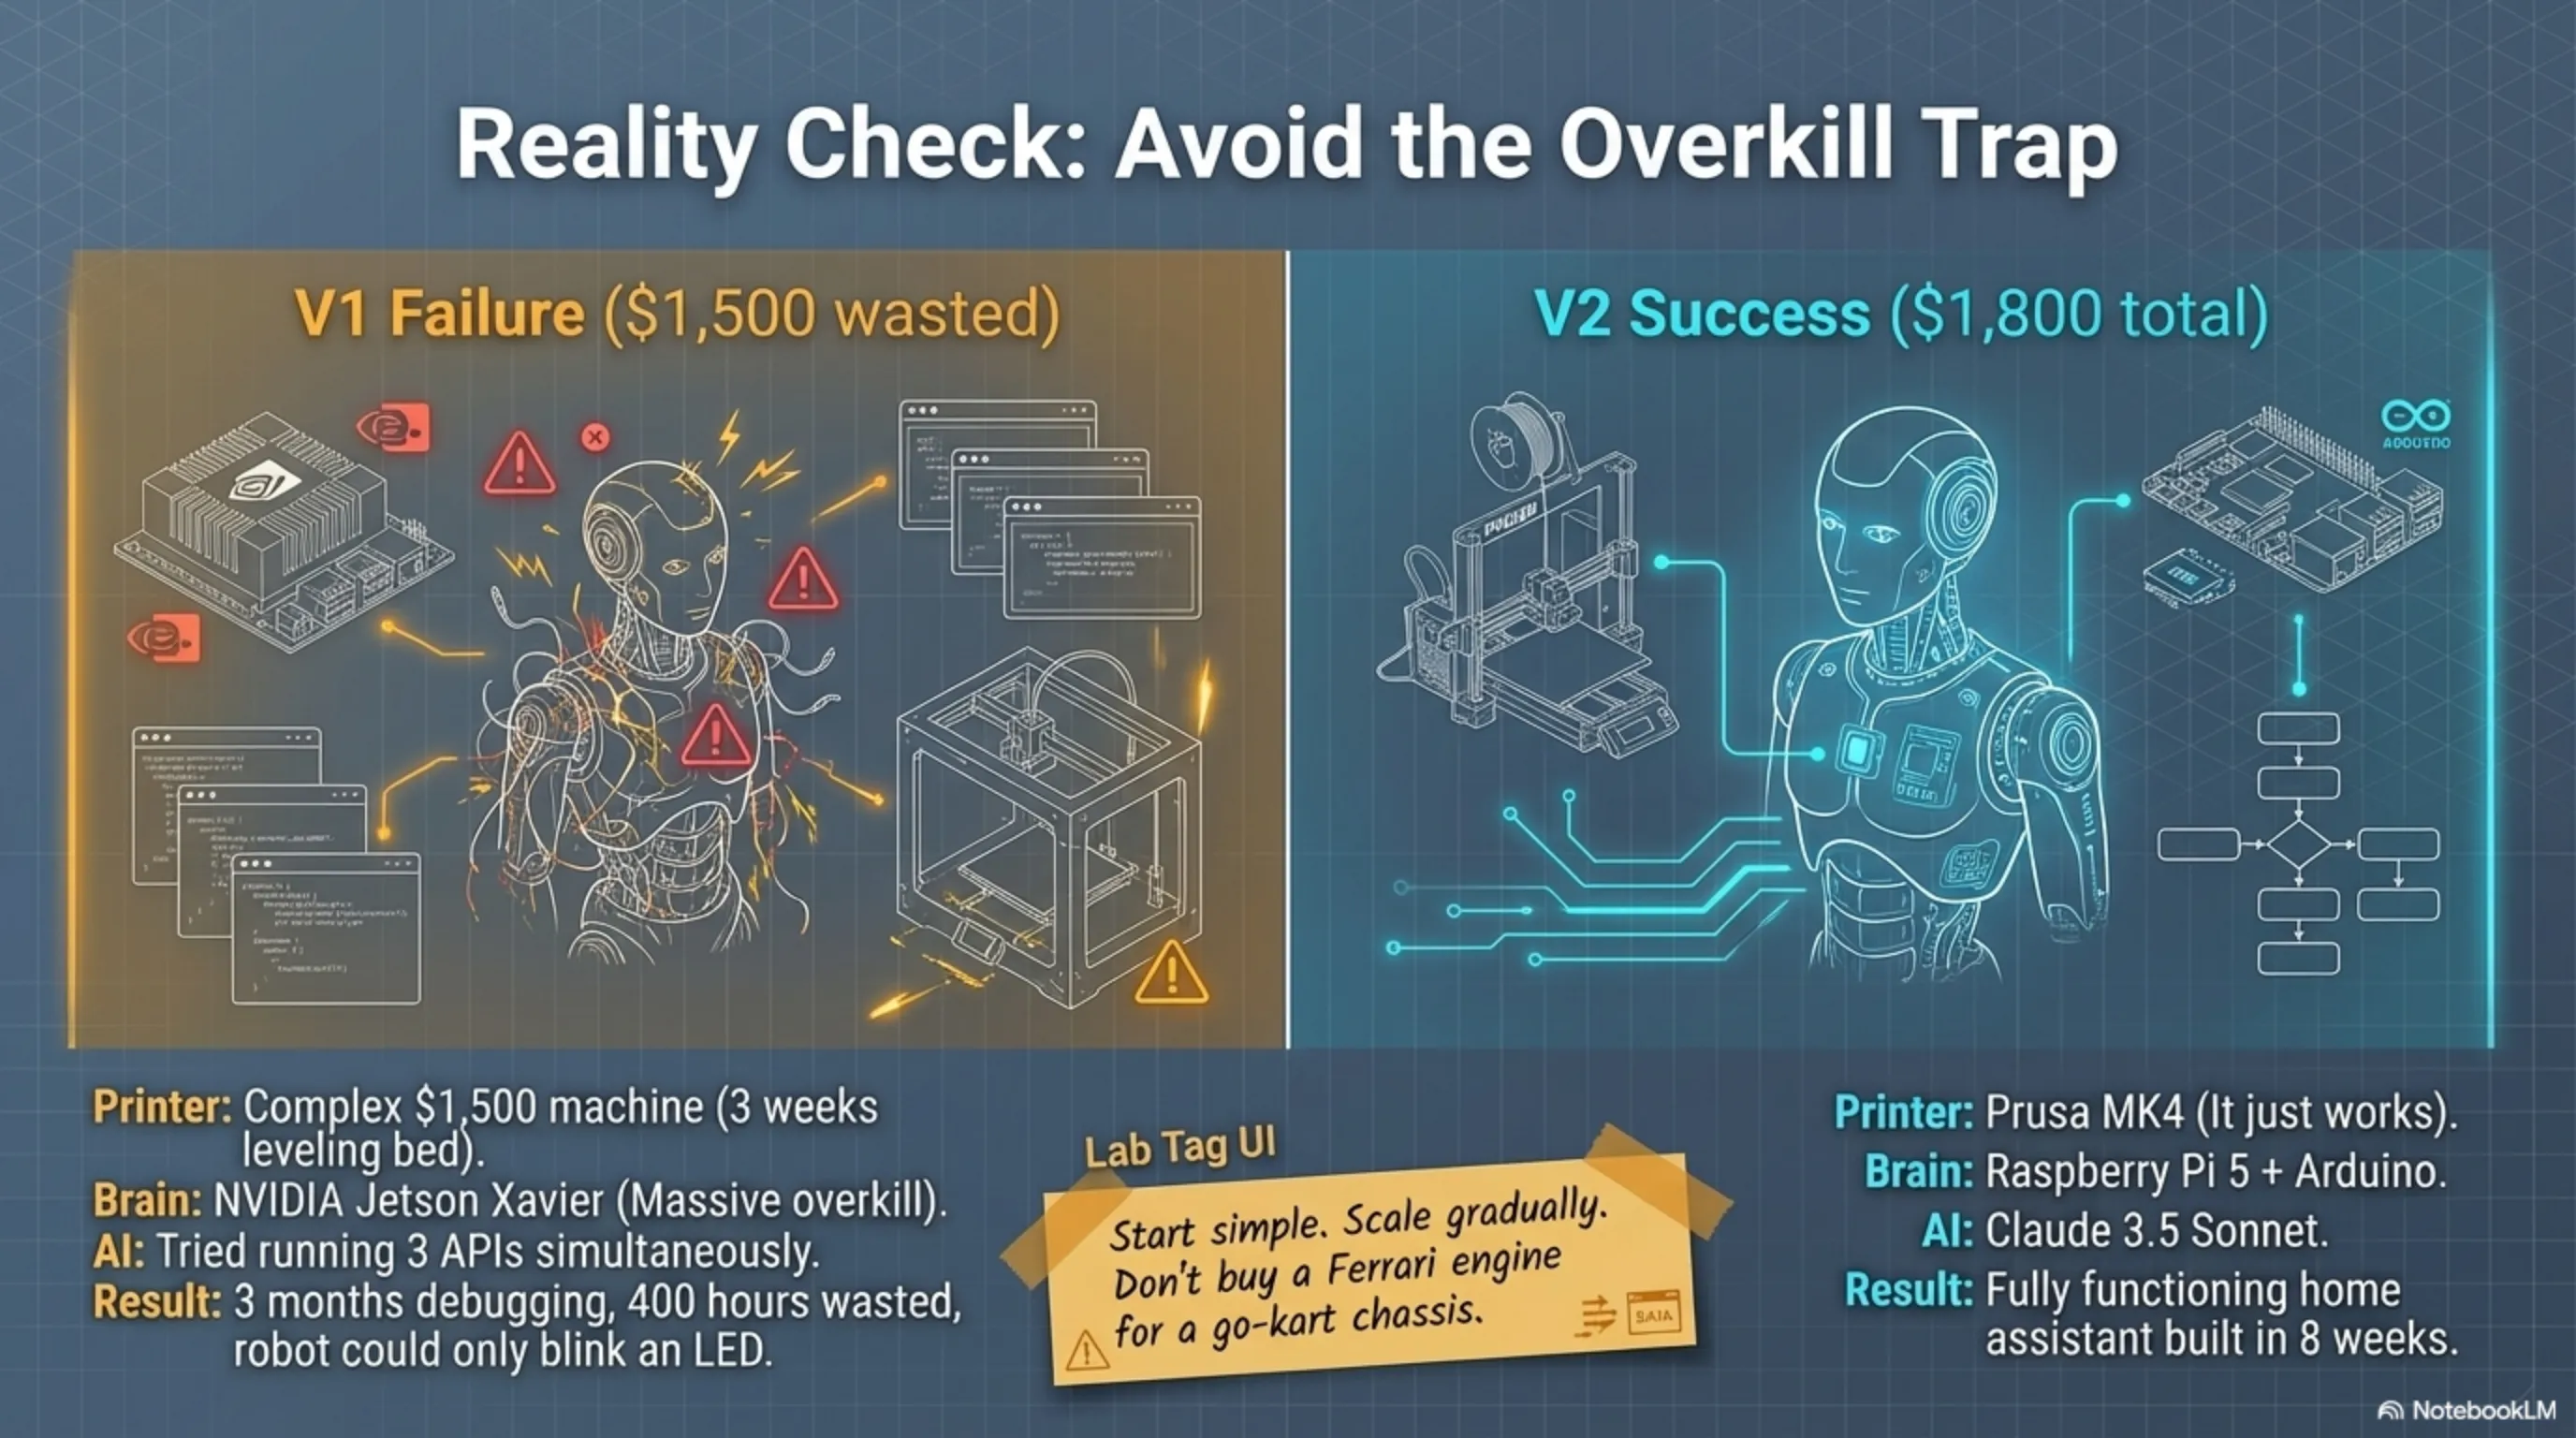
Let me tell you something you won't see in any guide: my first robot was a complete flop. I wanted to buy the best from the start. Got a $1,500 printer that was too complex, bought a Jetson Xavier NX that was overkill for me, and tried to use 3 APIs simultaneously. The result? 3 months of debugging, $400 of wasted filament, and a robot that could only turn on an LED! Big lesson: Start simple, learn gradually, upgrade in stages. That's it. My second robot was built with half the budget and worked 10 times better. Because this time I knew what I was doing.Section 1: The 3D Printer Battle - Which One to Buy?
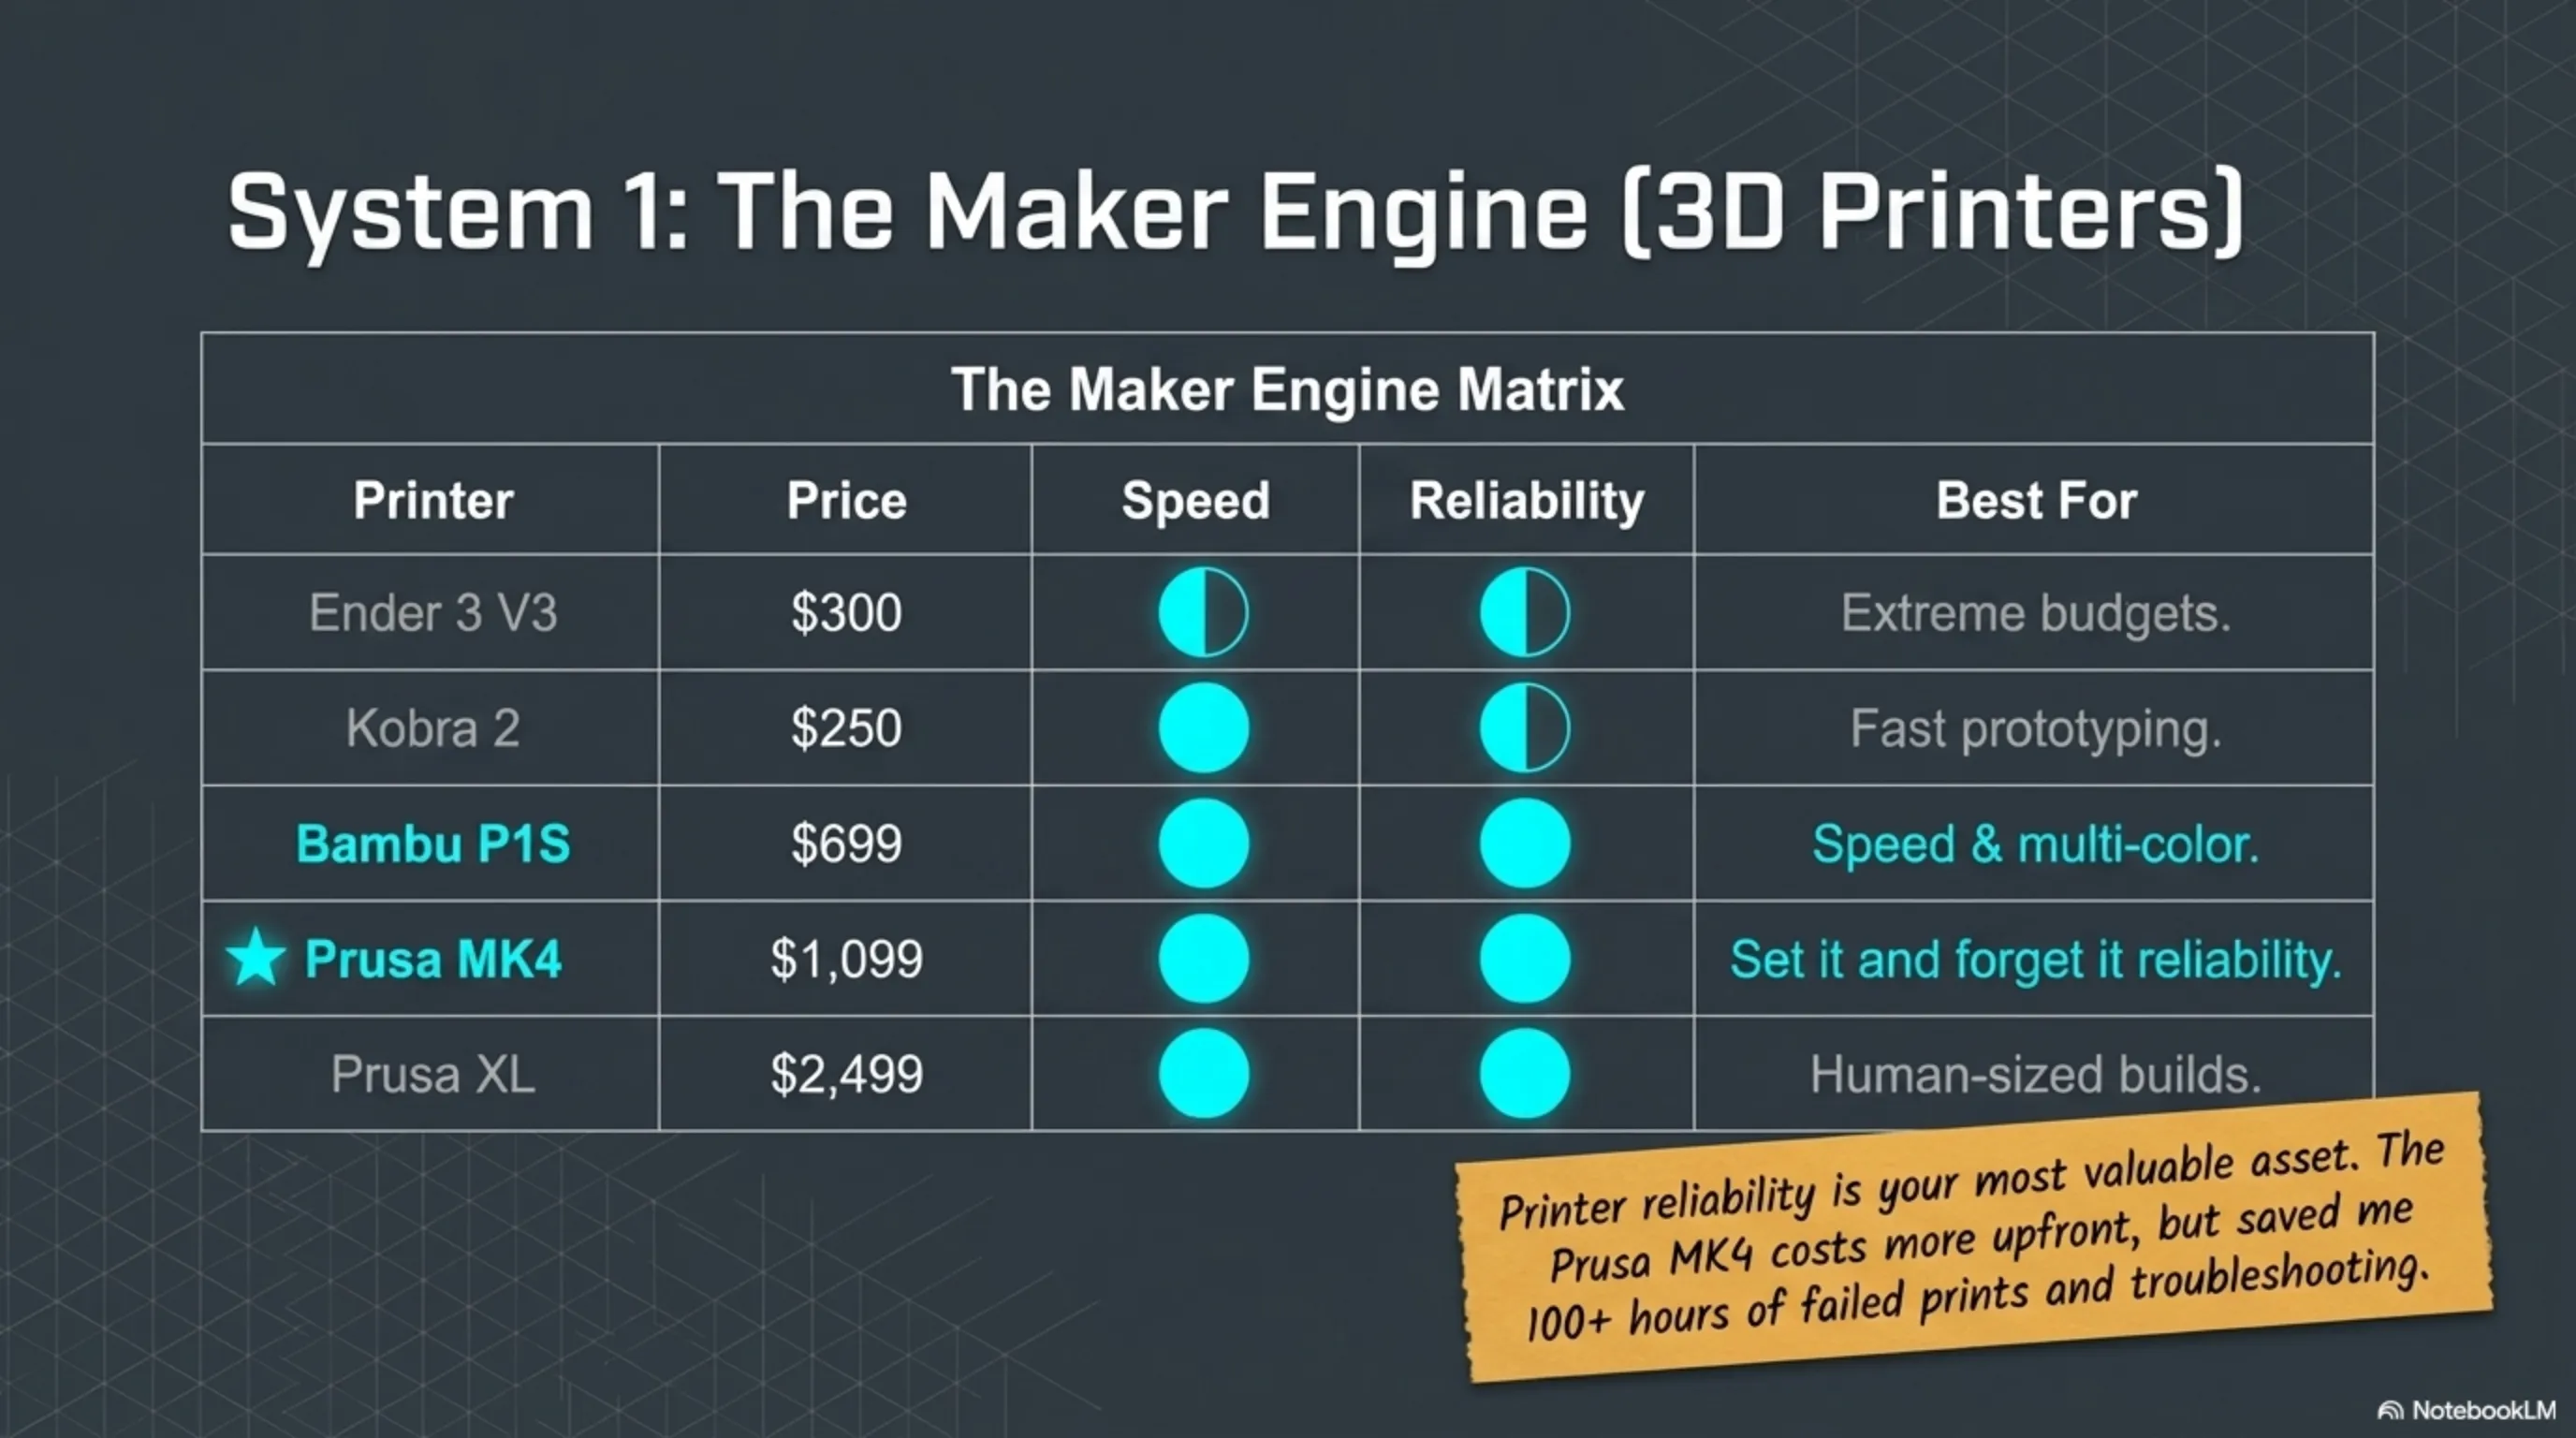
🥉 Beginner Level: $250-350 Printers
1️⃣ Creality Ender 3 V3 - The Budget King
Price: $300 Build Volume: 220×220×250mm Speed: 180mm/s (average) Accuracy: 0.1mm ✅ Why It's Great: - Huge community (millions of users) = solution for every problem - Cheap and available spare parts - Upgradeable (you can improve it later) - Great for learning ❌ Why It's Bad: - Needs manual adjustments (leveling, calibration) - Average print quality (good for simple parts) - Low speed (a large part takes 8-12 hours) 🎯 Who Is It For? If this is your first printer, you have a limited budget, and you want to learn how printers work—this is your choice. 💡 Personal Experience: My first robot was built with the Ender 3. The first 3 weeks I just learned how to do bed leveling! But once I learned, I printed good parts. It just takes patience.2️⃣ Anycubic Kobra 2 - Speed on a Budget
Price: $250 Build Volume: 220×220×250mm Speed: 250mm/s (fast!) Accuracy: 0.1mm ✅ Why It's Great: - Auto-leveling (half the hassle) - High speed for its price - Easy setup (2 hours) - Simple user interface ❌ Why It's Bad: - Smaller community (fewer online solutions) - Average build quality - Sometimes has firmware issues 🎯 Who Is It For? If you want to start quickly, don't have patience for manual adjustments, and speed matters to you. 💡 Important Note: The Kobra 2 is great for rapid prototyping. When you're testing designs and need to print 10 times until it's right, this speed is gold.🥈 Mid-Range Level: $700-1,100 Printers
This is where the magic happens. These printers have an excellent balance between price, quality, and reliability.3️⃣ Prusa MK4 - My Choice (And Many Others')
4️⃣ Bambu Lab P1S - Insane Speed
Price: $699 Build Volume: 256×256×256mm Speed: 500mm/s (crazy fast!) Accuracy: 0.1mm ✅ Why It's Great: - Fastest printer on the market (really!) - Multi-material printing (4 colors simultaneously) - Very quiet (important for home) - Excellent mobile app - Outstanding print quality ❌ Why It's Bad: - Closed source (can't customize) - Expensive spare parts - Sometimes cloud connectivity issues 🎯 Who Is It For? If speed is your priority. If you want to print 10 parts per day. If you want to make colorful parts. 💡 Interesting Story: My friend printed a complete robot hand with the P1S in 18 hours. The same job with my Ender 3 took 4 days! If time is money for you, this is a great investment.🥇 Professional Level: $2,000-5,000 Printers
Now it's serious business. These printers are for people who want to build really big or really complex things.5️⃣ Prusa XL - The Printing Beast
Price: $2,499 (single head) / $3,999 (5 heads) Build Volume: 360×360×360mm (huge!) Speed: 200mm/s Accuracy: 0.05mm ✅ Why It's Great: - Huge build volume (you can print the entire robot body in one piece) - 5 extruders (5 colors or 5 different materials) - Load cell bed leveling (automatic and precise) - Prusa reliability - Suitable for semi-mass production ❌ Why It's Bad: - Very expensive - Very large (needs lots of space) - High power consumption 🎯 Who Is It For? If you want to build large robots. If you want to build multiple robots simultaneously. If this is a business for you. 💡 When Is It Worth It: When you want to build a human-sized robot (120-150cm). When you want to print parts in one piece without welding. When time = money.6️⃣ Ultimaker S5 - Industrial Quality
Price: $4,500 Build Volume: 330×240×300mm Speed: 150mm/s Accuracy: 0.025mm (the best!) ✅ Why It's Great: - Industrial print quality - Professional dual extrusion - Wide material support (Nylon, PC, etc.) - 99% reliability - Suitable for commercial environment ❌ Why It's Bad: - Insane price - Slower than competitors - Overkill for home use 🎯 Who Is It For? Honestly? For 99% of people, this is overkill. Only if you want to make commercial parts or start a robotics startup.📊 Final Comparison Table
🎯 My Final Recommendation
If you have a limited budget (up to $350): Creality Ender 3 V3 - You'll learn, gain experience, and get acceptable results. If you want the best value for money ($700-1,100): Prusa MK4 - Without a doubt. Unmatched reliability and quality. I have this myself and love it. If speed is priority ($700): Bambu Lab P1S - Fastest, quietest, and very reliable. If you want to build large robots ($2,500+): Prusa XL - Huge build volume + Prusa reliability = excellent combination.💡 Golden Tips Before Buying
1. Workspace: Printers need space. Ender 3 minimum 50×50cm, Prusa XL minimum 80×80cm. Measure your space! 2. Noise: If you live in an apartment, get Bambu P1S or Prusa MK4. Ender 3 sounds like an old refrigerator! 3. Power: Printers consume 200-400 watts. If you print 24/7, your electricity bill will be $20-30 higher. 4. Filament: Don't forget filament budget! For an average robot, you need 3-5kg of filament = $60-150. 5. Time: Printing robot parts with Ender 3: 80-120 hours Printing robot parts with Bambu P1S: 30-40 hours Time = money. Calculate it!Section 2: The Filament War - Which Material for Which Part?
🎨 PLA - The Beginner's King
Price: $20-25/kg
Print Temperature: 190-220°C
Hardness: ⭐⭐⭐⭐
Flexibility: ⭐
Heat Resistance: ⭐⭐ (up to 60°C)
✅ Advantages:
- Easiest material to print
- No smell (important for home!)
- Many colors
- Reasonable price
- Doesn't need heated bed
❌ Disadvantages:
- Brittle (breaks under pressure)
- Heat sensitive (melts near motors)
- UV sensitive (breaks under sunlight)
- Can't screw into it (cracks)
🎯 For Which Parts?
- Outer shell (that doesn't take pressure)
- Decorative parts
- Initial prototype (for design testing)
- Internal parts that don't see heat
💡 My Experience:
Use PLA only for outer shell and non-critical parts. I printed the entire robot head with PLA—turned out great. But when I tried to make motor brackets with PLA? Broke after 3 days.
💰 Real Cost:
For an average robot: 1.5-2 kg = $30-50
💪 PETG - The Smart Choice
Price: $25-30/kg
Print Temperature: 220-250°C
Hardness: ⭐⭐⭐⭐
Flexibility: ⭐⭐⭐
Heat Resistance: ⭐⭐⭐⭐ (up to 80°C)
✅ Advantages:
- Excellent balance between strength and flexibility
- Impact resistant
- Heat resistant
- Can screw into it
- Moisture resistant
- Food-safe (for cooking robots!)
❌ Disadvantages:
- Slightly harder to print
- Needs heated bed (60-80°C)
- Sometimes has stringing
- Slightly more expensive than PLA
🎯 For Which Parts?
- Motor brackets (they see heat)
- Joints and connections (they take pressure)
- Load-bearing parts
- Parts that get screwed
💡 My Experience:
PETG became my main choice for 70% of robot parts. Strong, reliable, and relatively easy. I printed all joints, brackets, and structural parts with PETG—none broke.
💰 Real Cost:
For an average robot: 2-3 kg = $50-90
⚠️ Important Note:
PETG absorbs moisture. Definitely store it in a box with silica gel. I once printed wet filament—result? Parts full of bubbles and weak.
🔥 ABS - Pure Power
Price: $28-35/kg
Print Temperature: 230-260°C
Hardness: ⭐⭐⭐⭐⭐
Flexibility: ⭐⭐
Heat Resistance: ⭐⭐⭐⭐⭐ (up to 100°C)
✅ Advantages:
- Very strong and hard
- Excellent heat resistance
- Can smooth with acetone
- Chemical resistant
- Can be finished and painted
❌ Disadvantages:
- Bad smell (definitely needs ventilation!)
- Lots of warping (corners lift)
- Needs enclosure (closed chamber)
- Hard to print
🎯 For Which Parts?
- Parts near hot motors
- Parts that take high pressure
- Parts you want smooth and glossy
- High-temperature environments
💡 My Experience:
I only used ABS for motor brackets. Because stepper motors get hot (60-70°C) and PETG started softening. But printing ABS was a nightmare—failed 5 times before getting one successful print.
💰 Real Cost:
For an average robot: 0.5-1 kg = $15-35
⚠️ Health Warning:
ABS produces toxic fumes. Definitely print in open space or with ventilation fan. I once printed 8 hours in a closed room—got a terrible headache!
🤸 TPU - Magical Flexibility
Price: $35-45/kg
Print Temperature: 210-230°C
Hardness: ⭐⭐
Flexibility: ⭐⭐⭐⭐⭐
Heat Resistance: ⭐⭐⭐
✅ Advantages:
- Very flexible (like rubber)
- Impact resistant
- Excellent grip
- Wear resistant
- Silent
❌ Disadvantages:
- Very hard to print
- Very slow (speed 20-30mm/s)
- Needs direct drive extruder
- Expensive
🎯 For Which Parts?
- Wheels and tires
- Flexible joints
- Grippers (robot hand)
- Shock absorber pads
- Flexible cables
💡 My Experience:
I used TPU for robot wheels—difference was night and day! PLA wheels slipped on tiles, but TPU wheels had excellent grip. Just took 3 times longer to print.
💰 Real Cost:
For an average robot: 0.3-0.5 kg = $12-22
💡 Pro Tip:
Print TPU at 20-25mm/s speed. If you go faster, filament gets stuck in extruder. Be patient—it's worth it!
💎 Nylon - Ultimate Strength
Price: $40-60/kg
Print Temperature: 240-270°C
Hardness: ⭐⭐⭐⭐⭐
Flexibility: ⭐⭐⭐⭐
Heat Resistance: ⭐⭐⭐⭐⭐ (up to 120°C)
✅ Advantages:
- Strongest common filament
- Flexible and hard simultaneously
- Excellent wear resistance
- Can screw into it
- Chemical resistant
❌ Disadvantages:
- Very hard to print
- Absorbs moisture like a sponge
- Needs enclosure and high temperature
- Lots of warping
- Very expensive
🎯 For Which Parts?
- Gearboxes
- Bearings
- High-wear parts
- Critical parts that shouldn't break
💡 My Experience:
I only used Nylon for robot hand grippers. Because they had to open and close thousands of times without breaking. Result? After 6 months and 10,000+ movements, they still work like day one.
💰 Real Cost:
For an average robot: 0.2-0.4 kg = $8-24
⚠️ Critical Note:
Definitely dry Nylon before printing. I bought a food dehydrator ($30) and dry filament for 6 hours at 70°C. Print quality difference? 300%!
📊 Quick Material Selection Table
💰 Complete Filament Cost for Average Robot
Scenario 1: Budget (PLA and PETG only) - PLA: 1.5 kg × $22 = $33 - PETG: 2 kg × $28 = $56 - TPU: 0.3 kg × $40 = $12 - Total: $101 Scenario 2: Balanced (Material mix) - PLA: 1 kg × $22 = $22 - PETG: 2.5 kg × $28 = $70 - TPU: 0.5 kg × $40 = $20 - ABS: 0.5 kg × $32 = $16 - Total: $128 Scenario 3: Professional (Best materials) - PLA: 0.5 kg × $22 = $11 - PETG: 2 kg × $28 = $56 - TPU: 0.8 kg × $40 = $32 - ABS: 0.8 kg × $32 = $26 - Nylon: 0.4 kg × $50 = $20 - Total: $145 💡 Note: This is only for main parts. For prototypes and wrong parts, add 30-50%!🎓 Professional Filament Storage Tips
1. Moisture = Enemy #1 All filaments (especially Nylon and TPU) absorb moisture. Signs of wet filament: - Pop pop sound during printing - Rough and uneven surface - Less strength Solution: Sealed box + silica gel packets ($10) 2. Storage Temperature Keep filament away from sunlight and heat. Ideal temperature: 15-25°C 3. Drying Filament If filament gets wet: - PLA/PETG: 50°C for 4-6 hours - ABS: 60°C for 4-6 hours - Nylon/TPU: 70°C for 6-8 hours I use a food dehydrator—works great! 4. Colors Dark colors (black, brown) are stronger than light colors (white, yellow). For critical parts, get dark colors. 5. Brand Matters! Good brands: Prusament, eSun, Polymaker, Overture Bad brands: No-name Chinese filaments (irregular diameter = bad print) Price difference? $5-10. Quality difference? Night and day!Section 3: Battle of the Brains - Claude vs Gemini vs GPT-4
⚠️ Bitter Reality Before Starting
Everyone thinks AI APIs are free or very cheap. Big mistake! My real costs in 3 months: - Month 1 (testing and learning): $180 - Month 2 (normal use): $95 - Month 3 (optimized): $42 Why this difference? Because I learned how to use them smartly. And that's exactly what I'll teach you.🤖 Claude (Anthropic) - Master of Deep Thinking
Available Models:
- Claude 3.5 Sonnet: Excellent balance (my recommendation) - Claude 3 Opus: Most powerful (but expensive!) - Claude 3 Haiku: Fast and cheap (for simple tasks)💰 Pricing (Claude 3.5 Sonnet):
- Input: $3 per 1 million tokens - Output: $15 per 1 million tokens What does this mean in plain English? - One 500-word conversation: about $0.01 - 100 conversations per day: about $1 - One month average use: $30-50✅ Why Claude Is Great:
1. Deep Thinking and Strong Reasoning When you ask the robot: "Should I charge now or finish the task?" - Claude analyzes all factors: - Current battery: 15% - Remaining task time: 20 minutes - Charging time: 45 minutes - Task priority: High - Result: "Finish the task, then charge" This logical decision-making is Claude's strength. 2. Huge Context Window (200K tokens) You can give it an entire day's conversation history and it still remembers. For a home robot that needs to remember what you said in the morning? Gold! 3. Safety and Ethics Claude is very cautious. If your robot works with children, Claude will never say anything inappropriate. 4. Excellent Coding When you want the robot to learn a new task, Claude can write Python code and execute it itself.❌ Why Claude Is Bad:
1. Somewhat Slow Response time: 3-8 seconds For real-time conversation, sometimes sluggish. 2. More Expensive Than Gemini About 10 times more expensive than Gemini Flash! 3. Rate Limit Restrictions Free version: 50 requests per day Paid version: 1000 requests per day If your robot is very chatty, you might hit the limit.🎯 For What Use?
- Complex decision-making - Daily planning - Analysis and reasoning - Learning and teaching - Deep conversations💡 My Real Experience:
My robot with Claude can: - Organize my daily schedule based on my tasks - Decide which task has priority - Remind me not to forget my appointment - Even suggest "you're tired today, better rest" This level of intelligence is only with Claude.💰 My Real Monthly Cost:
- Light use (10 conversations/day): $15-20 - Average use (30 conversations/day): $40-50 - Heavy use (100 conversations/day): $120-150 Note: I reduced cost from $95 to $42 with optimization. How? I'll tell you later!⚡ Google Gemini - Speed and Economy
Available Models:
- Gemini 1.5 Pro: Powerful and multimodal - Gemini 1.5 Flash: Super fast and cheap (my recommendation!)💰 Pricing (Gemini 1.5 Flash):
- Input: $0.35 per 1 million tokens - Output: $1.05 per 1 million tokens What does this mean in plain English? - One 500-word conversation: about $0.001 (one-tenth of a cent!) - 100 conversations per day: about $0.10 - One month average use: $3-10 Yes, you read that right—10 times cheaper than Claude!✅ Why Gemini Is Great:
1. Insane Speed Response time: 0.5-2 seconds For real-time conversation, excellent! 2. True Multimodal Gemini can simultaneously: - See images (robot camera) - Hear audio (microphone) - Read text - Analyze video Real example: My robot with Gemini can look in the fridge and say: "Milk's finished, should I add to shopping list?" 3. Unbelievable Price With $10, you use it for a full month! 4. Large Context Window (1M tokens) Even bigger than Claude! You can give it an entire week's history. 5. Google Integration If you use Google Calendar, Gmail, Google Home, Gemini can work with them.❌ Why Gemini Is Bad:
1. Weaker Reasoning For complex decision-making, doesn't match Claude. 2. Sometimes Hallucinates Meaning it says things that aren't true. You need to check the output. 3. Less Cautious Compared to Claude, focuses less on safety.🎯 For What Use?
- Image and video processing - Object recognition - Quick conversations - Simple and repetitive tasks - Limited budget💡 My Real Experience:
I use Gemini Flash for: - Face recognition (who's home?) - Object recognition (what's on the table?) - Quick conversations ("what time is it?") - Repetitive tasks ("set 5-minute timer") Fast, cheap, and sufficient.💰 My Real Monthly Cost:
- Light use: $3-5 - Average use: $8-12 - Heavy use: $20-30 Note: I use a combination of Claude + Gemini. Simple tasks with Gemini (cheap), complex tasks with Claude (smart). Best of both worlds!🚀 OpenAI GPT-4 - King of Creativity
Available Models:
- GPT-4o: Newest, fastest - GPT-4 Turbo: Powerful but slower - GPT-3.5 Turbo: Cheap but weaker💰 Pricing (GPT-4o):
- Input: $5 per 1 million tokens - Output: $15 per 1 million tokens What does this mean in plain English? - One 500-word conversation: about $0.015 - 100 conversations per day: about $1.50 - One month average use: $45-70✅ Why GPT-4 Is Great:
1. Unmatched Creativity If you want your robot to joke, recite poetry, or tell stories—GPT-4 is the best. 2. Natural Conversation GPT-4 has the most natural conversation. It's like talking to a human. 3. Strong Support OpenAI has the largest community. Whatever problem you have, you'll find a solution. 4. Plugin Ecosystem Thousands of plugins for GPT-4. You can connect it to Spotify, Uber, Wolfram Alpha. 5. Voice Mode GPT-4 can speak directly (very good text-to-speech).❌ Why GPT-4 Is Bad:
1. Expensive More expensive than Gemini, slightly cheaper than Claude Opus. 2. Sometimes Too Chatty GPT-4 likes to talk a lot. For simple tasks, it's overkill. 3. Hard Rate Limiting Free version is very limited. You need to get paid.🎯 For What Use?
- Natural and friendly conversations - Entertainment and games - Creativity (poetry, stories, jokes) - Teaching and explaining - Social robots💡 My Real Experience:
I used GPT-4 for robot personality. My robot: - Wakes me up with a joke in the morning - Tells stories at night - Comforts me when I'm sad - Talks like a real friend This level of personality is only possible with GPT-4.💰 My Real Monthly Cost:
- Light use: $20-30 - Average use: $50-70 - Heavy use: $100-150⚔️ Final Comparison: Which to Buy?
🎯 My Final Recommendation (After 4 Months Testing)
If you have limited budget (up to $15/month): Gemini Flash - Without a doubt. Fast, cheap, and sufficient for 80% of tasks. If you want best decision-making ($30-50/month): Claude 3.5 Sonnet - Strong reasoning, deep thinking, reliable. If you want friendly and creative robot ($45-70/month): GPT-4o - Natural conversation, excellent personality, high creativity. If you have good budget ($60-100/month): Combination of all! I do this: - Gemini Flash: Simple and quick tasks (70% use) - Claude Sonnet: Important decisions (20% use) - GPT-4o: Social conversations and entertainment (10% use) Result? Best of all worlds at reasonable cost!💡 How to Reduce Cost by 60%?
I reduced my monthly cost from $95 to $42. Here's how: 1. Smart Caching Save repetitive answers. For example: - "What time is it?" → No need for API - "What's the weather?" → Check once per hour, not every time 2. Local Processing Do simple tasks locally: - Face recognition: OpenCV (free!) - Speech-to-text: Whisper local (free!) - Timers and reminders: local (free!) Only send complex tasks to API. 3. Prompt Optimization Shorter prompt = less cost Before: "Hello! I wanted to ask if it's possible that..." (20 tokens) After: "Can I..." (4 tokens) 4. Use Cheaper Models - Simple tasks: Gemini Flash - Medium tasks: Claude Haiku - Complex tasks: Claude Sonnet 5. Batch Processing Instead of 100 separate requests, send 10 requests with 10 questions each. Result: - Before: 3000 requests/day × $0.03 = $90/month - After: 500 requests/day × $0.08 = $40/month Same quality, half the cost!Section 4: Hardware and Assembly - From Parts to Complete Robot
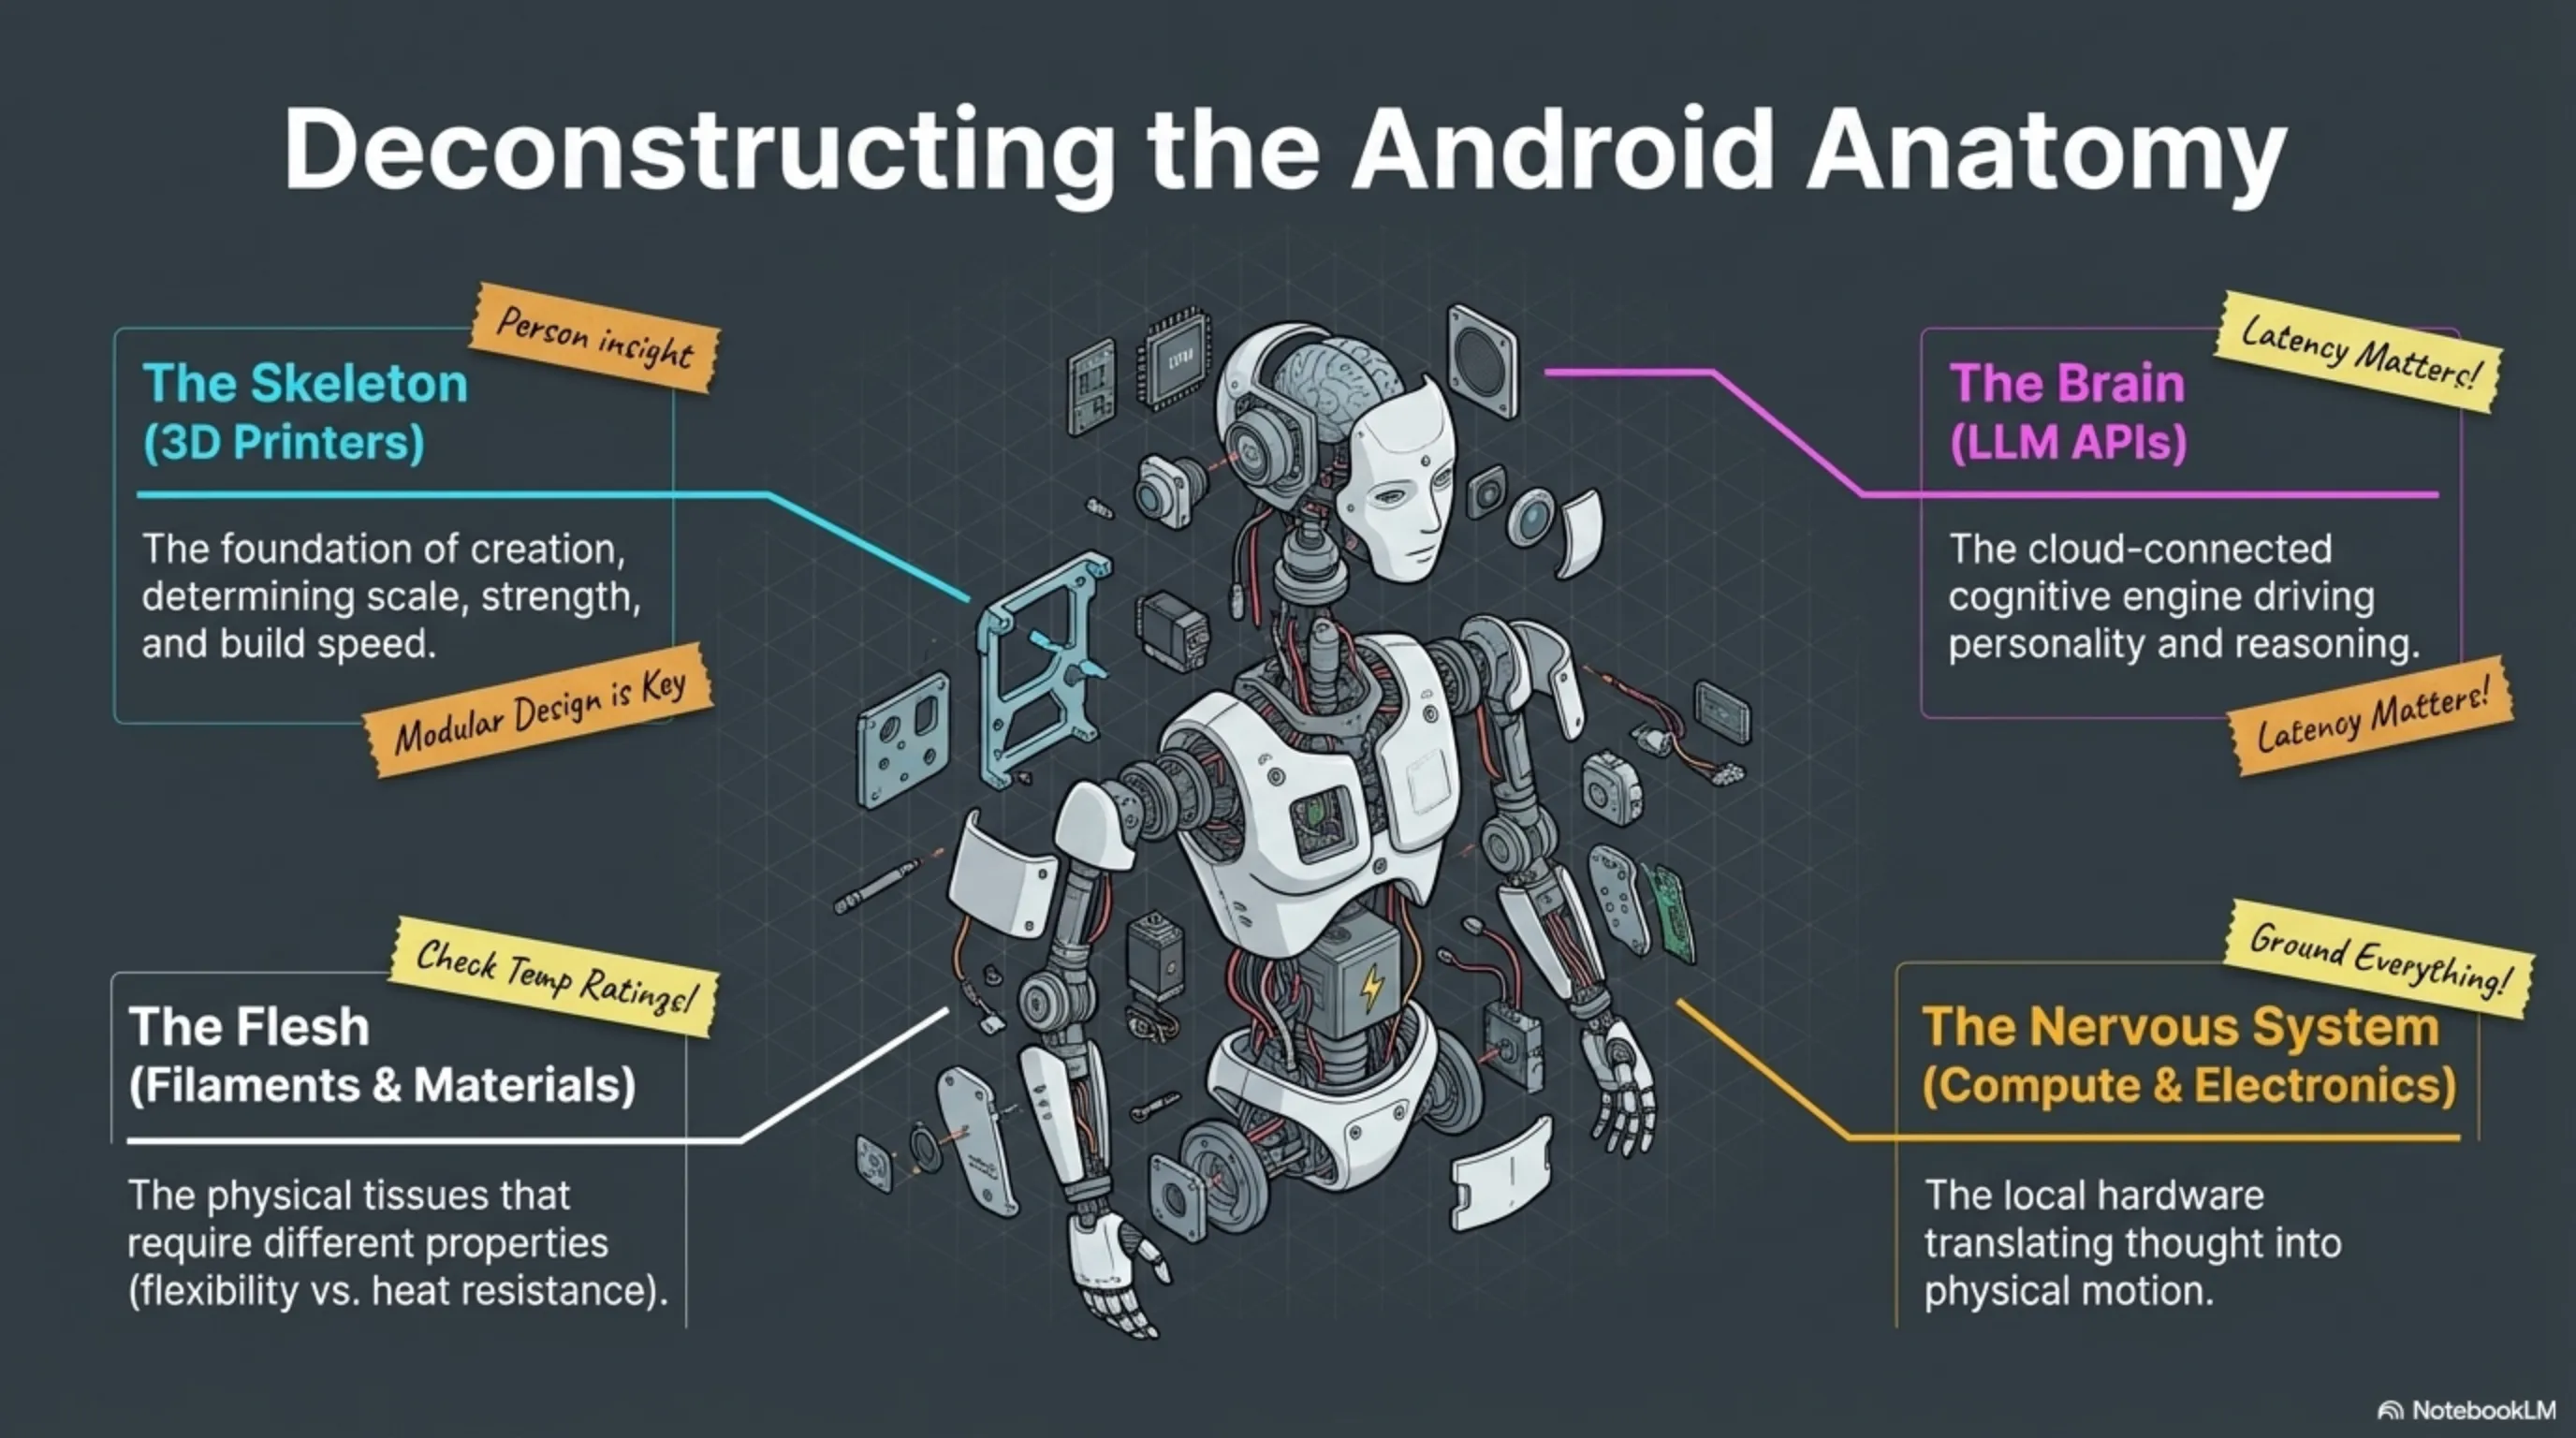
🧠 Central Brain: Raspberry Pi vs Jetson
Beginner Level: Raspberry Pi 4 (8GB) - $75
Specifications: - CPU: Quad-core ARM Cortex-A72 @ 1.8GHz - RAM: 8GB - GPIO: 40 pins - USB: 4 ports - Power Consumption: 15W ✅ Advantages: - Cheap and available - Huge community (millions of projects) - Low power consumption - Easy to start - Excellent support ❌ Disadvantages: - Limited processing power - Can't run heavy AI models - Slow for computer vision 🎯 Who Is It For? If you want a simple robot, have limited budget, and don't need real-time image processing. 💡 My Experience: My first robot was built with Pi 4. For basic tasks (conversation, movement, sensors) it was great. But when I wanted to add face recognition? Took 5 seconds to recognize one face!Mid-Range Level: Raspberry Pi 5 (8GB) - $80
Specifications: - CPU: Quad-core ARM Cortex-A76 @ 2.4GHz (2.5× faster!) - RAM: 8GB - GPIO: 40 pins - PCIe: SSD support - Power Consumption: 25W ✅ Advantages: - Much faster than Pi 4 - SSD support (high speed) - Still low power consumption - Great price - Latest technology ❌ Disadvantages: - Still not enough for heavy AI - Slightly hotter than Pi 4 (needs fan) 🎯 My Recommendation: If you're going with Raspberry Pi, get Pi 5. Only $5 more, but 2.5 times faster!Professional Level: NVIDIA Jetson Orin Nano - $500
Specifications: - GPU: 1024-core NVIDIA Ampere - RAM: 8GB - AI Performance: 40 TOPS - Power Consumption: 15W ✅ Advantages: - Real AI power (can run large models) - Real-time face recognition (30 FPS) - Multiple camera processing simultaneously - Reasonable power consumption ❌ Disadvantages: - Expensive (6 times Pi 5!) - More complex to setup - Needs good cooling 🎯 Who Is It For? If you want your robot to truly see, recognize, and make real-time decisions. 💡 My Experience: When I upgraded to Jetson, my world changed. Face recognition went from 5 seconds to 0.1 seconds. Robot could process 3 cameras simultaneously. Worth every dollar!🎮 Motor Controller: Arduino
Arduino Mega 2560 - $40
Why Arduino? Because Raspberry Pi isn't suitable for precise motor control. Arduino does this job excellently. Specifications: - 54 digital pins - 16 analog pins - 16MHz - Real-time control Use: - Motor control - Reading sensors - PWM for motor speed - Communication with Raspberry Pi 💡 Note: Arduino does real-time tasks, Raspberry Pi does complex tasks. These two make an excellent team!👀 Eyes: Cameras
Beginner Level: Raspberry Pi Camera Module 3 - $25
- Resolution: 12MP - Video: 1080p @ 30fps - Field of View: 75 degrees - Connection: CSI to Raspberry Pi Sufficient for: Simple recognition, photography, video callsProfessional Level: Intel RealSense D435 - $200
- Depth camera (can measure distance!) - Resolution: 1920×1080 - Range: up to 10 meters - FPS: 90 Sufficient for: Navigation, obstacle avoidance, 3D mapping👂 Ears: Microphone
ReSpeaker 4-Mic Array - $25
- 4 microphones (sound direction detection) - Noise cancellation - USB connection - Raspberry Pi support 💡 Why 4 Microphones? Robot can detect which direction sound comes from and turn that way!💪 Muscles: Motors
For Movement: DC Motors with Encoder - $15/each
- Voltage: 12V - Speed: 200 RPM - Encoder: for precise control - Quantity needed: 2-4 (depending on design)For Arms: Servo Motors - $12/each
- Angle: 180 degrees - Torque: 15 kg.cm - Precise position control - Quantity needed: 4-6 (for one arm)For Gripper: Mini Servo - $8/each
- Angle: 180 degrees - Torque: 3 kg.cm - Small and light - Quantity needed: 1-2🔋 Heart: Battery and Power Supply
LiPo Battery 3S 5000mAh - $45
- Voltage: 11.1V - Capacity: 5000mAh - Operating time: 2-4 hours - Weight: 350 gramsStep-down Converter - $8
For converting 12V to 5V (for Raspberry Pi)Battery Management System (BMS) - $15
For safe charging and battery protection📡 Additional Senses: Sensors
Essential Sensors:
- Ultrasonic sensor (distance): $3 × 3 = $9
- IMU (gyroscope + accelerometer): $15
- Touch sensors: $2 × 4 = $8
Optional Sensors:
- Temperature sensor: $5
- Light sensor: $3
- GPS module: $25
- LiDAR (professional): $400
💰 Complete Hardware Cost Table
🔧 Assembly: From Parts to Robot
Stage 1: Printing Parts (1-3 weeks)
Main Parts: - Main body (Base): 12 hours print - Head and neck: 8 hours - Arms (2): 16 hours - Legs/wheels: 10 hours - Brackets and connections: 20 hours Total Print Time: 66 hours = 3-7 days (depending on printer) 💡 Note: Always print 2-3 extra parts. Because some break!Stage 2: Mechanical Assembly (2-3 days)
Tools Needed: - Various screwdrivers - Allen wrenches - Super glue - Screws and nuts (M3, M4) - Wire stripper Assembly Order: 1. Install motors on brackets 2. Attach wheels to motors 3. Assemble main body 4. Install arms 5. Attach head and neck ⚠️ Common Mistake: Don't tighten screws too much! Plastic parts crack.Stage 3: Wiring (1-2 days)
Main Connections: - Raspberry Pi ← Arduino (USB) - Arduino ← Motors (PWM) - Arduino ← Sensors (GPIO) - Raspberry Pi ← Camera (CSI) - Raspberry Pi ← Microphone (USB) - All ← Battery (with voltage regulator) 💡 Golden Tip: Use colored wires: - Red: + - Black: - - Yellow: Signal - Blue: Data Troubleshooting becomes much easier!Stage 4: Initial Testing (1 day)
Essential Tests: 1. Raspberry Pi turns on ✓ 2. Communication with Arduino ✓ 3. Motors move ✓ 4. Sensors read ✓ 5. Camera works ✓ 6. Audio recording ✓ ⚠️ Warning: If something doesn't work, fix it now! After complete assembly, access is hard.❌ 10 Common Mistakes (That I Made!)
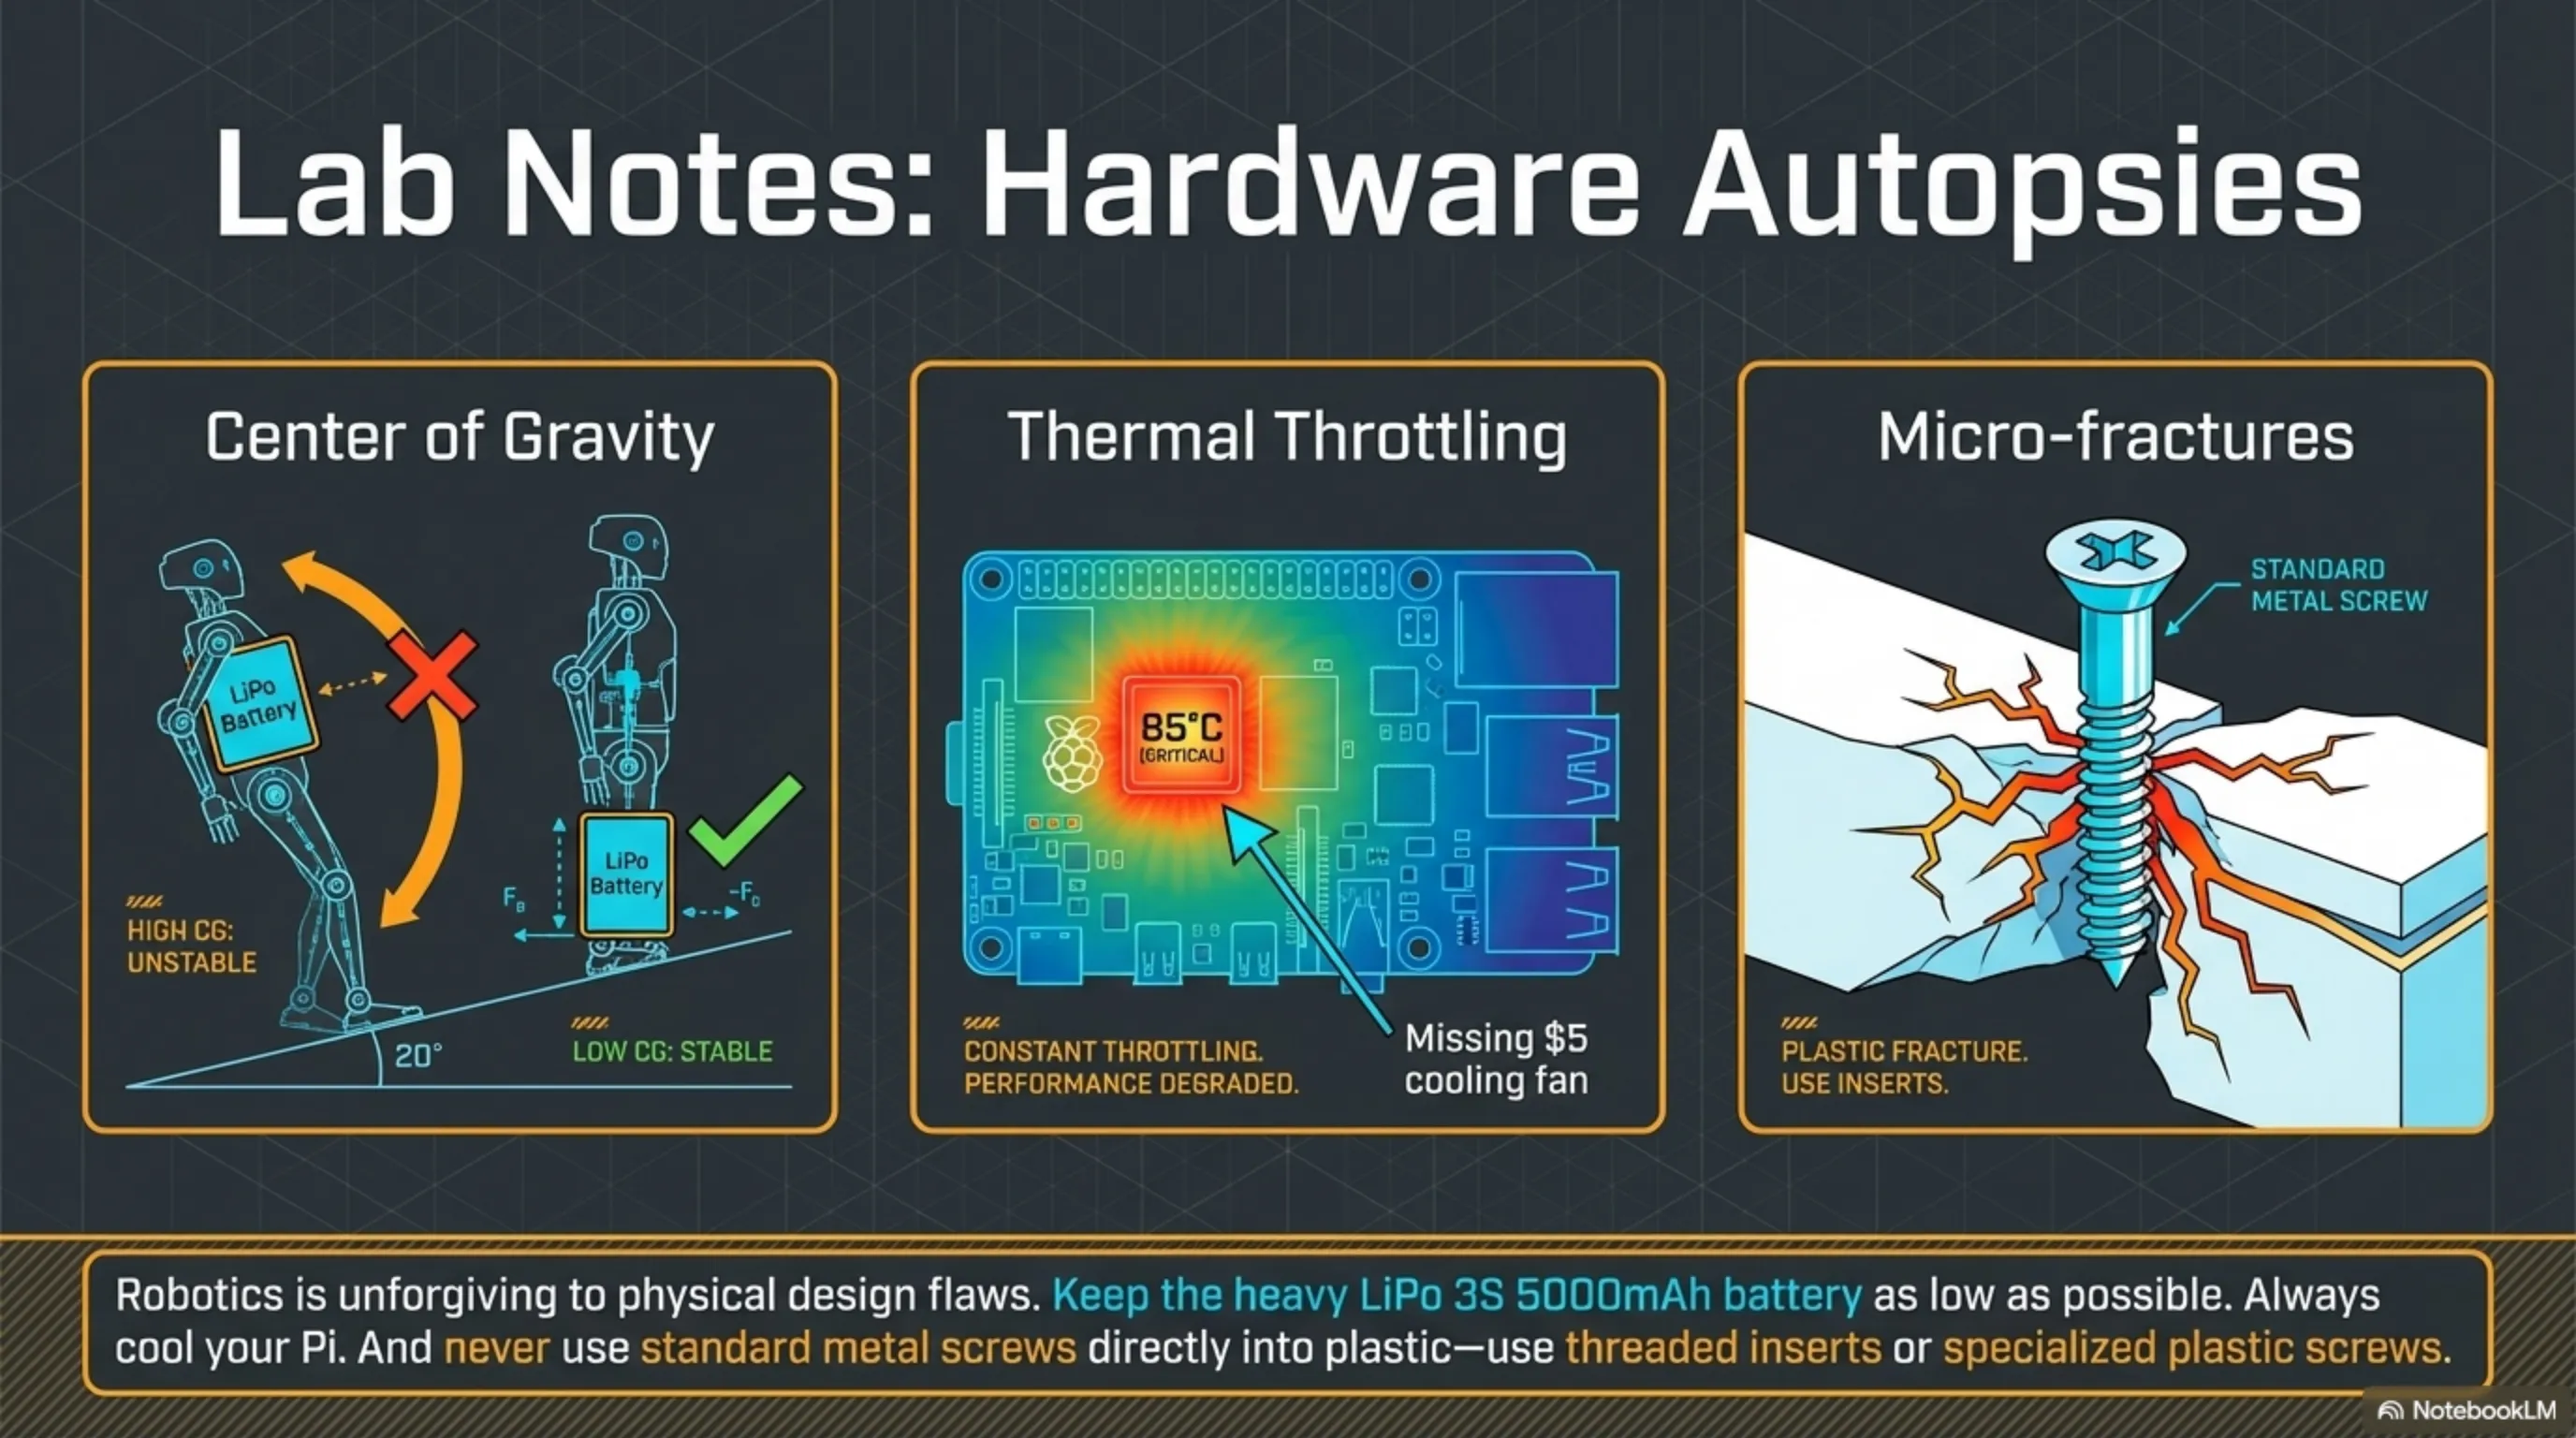
1. Forgetting Battery Space Battery needs space! I had to redesign the body. 2. Short Wires Always cut 20% more wire than needed. 3. Not Enough Cooling Raspberry Pi and motors get hot. Don't forget the fan! 4. Incorrect Sensor Installation Ultrasonic sensor must be free, not behind plastic! 5. Wrong Weight Distribution Put battery at bottom, not top. Otherwise robot falls! 6. Forgetting Power Switch Add an on/off switch. Otherwise you have to disconnect battery every time! 7. Not Using Fuse Once had a short circuit, Arduino burned. A $5 fuse could have prevented it. 8. Not Testing Before Complete Assembly Test everything before closing the body! 9. Using Wrong Screws Metal screws in plastic = crack. Use plastic-specific screws. 10. Rushing Hasty assembly = later problems. Be patient!⏱️ Real Build Timeline
Week 1-2: Design and Ordering - Choose design or custom design - Order electronic parts - Get filament Week 3-4: Printing Parts - Print main parts - Print spare parts - Test print quality Week 5: Mechanical Assembly - Install motors - Assemble body - Install arms Week 6: Wiring and Electronics - Connect all parts - Initial testing - Troubleshooting Week 7-8: Programming - Install software - Coding - AI integration Week 9-12: Testing and Optimization - Performance testing - Bug fixing - Optimization Total: 2-3 months (with part-time work)Conclusion: Ready to Build Your Own Robot?
💭 The Reality of Building a Home Robot
Things no guide tells you: 1. Failures Are Many I built 3 robots. First was a flop. Second was semi-successful. Third turned out great. This is natural! 2. Time Is More Than You Think I thought it would take 1 month. Took 4 months. And I'm still improving it! 3. Cost Is More Than Initial Budget My initial budget was $1,500. Spent $2,300. Because of extra parts, tools, and mistakes. 4. Learning Curve Is Steep You need to learn: 3D printing, electronics, programming, AI, mechanical design. That's a lot! 5. But It's Worth It! When your robot first says "good morning" to you, all the pain and suffering is forgotten. I promise!📊 Summary of Three Scenarios
🎯 My Final Recommendation
If this is your first robotics project: Beginner scenario ($800) - You'll learn, gain experience, and if you don't like it, you haven't lost much. If you're serious and want good results: Mid-range scenario ($1,800) - This is what I built. Excellent balance between price, quality, and capability. If you want something truly professional: Professional scenario ($4,500) - But only if you have experience or want to turn this into a business. 💡 Golden Tip: Start with beginner, then upgrade. I did this and don't regret it!📚 Learning Resources
Websites:
- Thingiverse.com - Thousands of free designs
- Printables.com - Quality designs
- Instructables.com - Step-by-step guides
- Reddit.com/r/3Dprinting - Active community
YouTube:
- "Teaching Tech" - 3D printing tutorials
- "Maker's Muse" - Creative projects
- "The Robot Studio" - Practical robotics
- "Sentdex" - AI programming
Books:
- "Make: 3D Printing" - Anna Kaziunas France
- "Programming Robots with ROS" - Morgan Quigley
- "Hands-On Machine Learning" - Aurélien Géron
Online Courses:
- Coursera: "Robotics Specialization"
- Udemy: "Complete 3D Printing Course"
- YouTube: "Raspberry Pi for Beginners"
🚀 Your Next Steps
Today:
1. Decide which scenario you want
2. Prepare shopping list
3. Join online communities
This Week:
1. Order printer
2. Buy electronic parts
3. Choose robot design
Month 1:
1. Get familiar with printer
2. Print simple parts
3. Work with Raspberry Pi
Month 2:
1. Print main parts
2. Mechanical assembly
3. Wiring
Month 3:
1. Programming
2. AI integration
3. Testing and optimization
Month 4:
1. Bug fixing
2. Adding new features
3. Enjoying your robot! 🎉